
Hi Girls!
Today I want to introduce you to the unique Nanolash Lash Lift Kit which helped me perform a lash lift at home. If you read my blog regularly, you probably know that when it comes to eyelash products, I don’t accept compromises. I always have high expectations that specific products meet or fail to meet. I tested the Nanolash Lift Kit and want to share my findings with you.
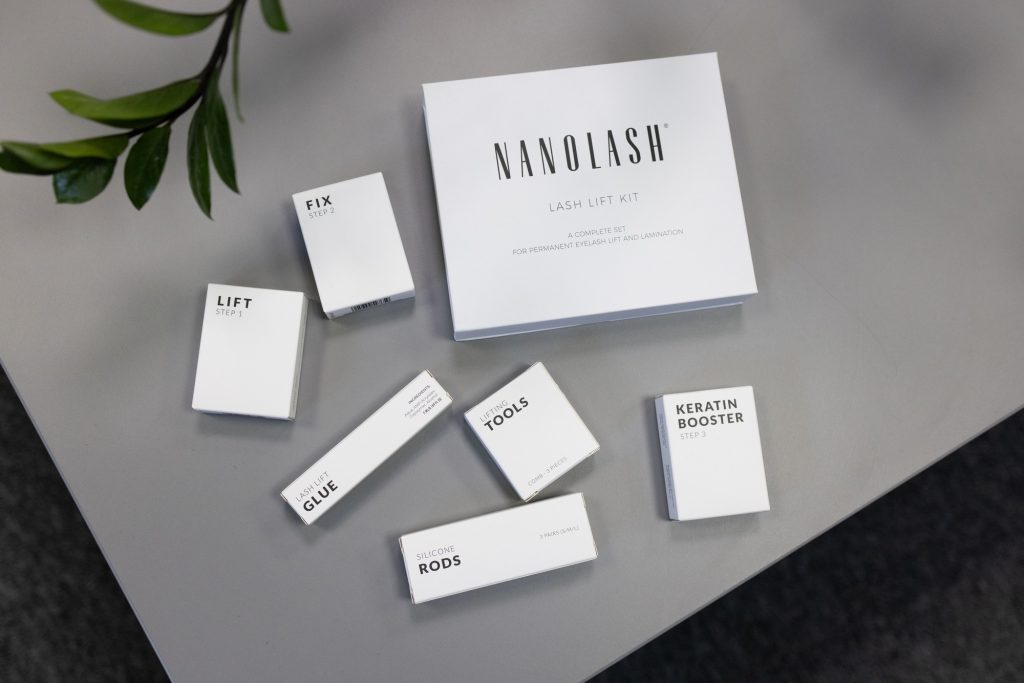
Nanolash Lash Lift Kit – what does it contain?
Nanolash Lift Kit – a lash lamination kit that comes from a brand which holds a special place in my heart. I make no secret of it, I have tested many products from Nanolash and I still use some of them today.
In order to introduce the lash lift kit in a nutshell, I’ll start with what it actually contains:
- 3 formulas for laminating eyelashes – Lift – Step 1, Fix – Step 2 and Keratin Booster – Step 3;
- 3 pairs of silicone rods in 3 different sizes;
- basic accessories for applying the products;
- Lash Lift Glue for attaching the rods to the eyelids.
You can see that the kit is complete. However, that’s not all! Each product comes in a quantity of 10 x 0.5 milliliter sachets. This means that with one kit, you can perform as many as 10 lash laminations. From an economic perspective, this is an extremely beneficial solution.
I would like to emphasize one more aspect. The products available in the Nanolash Lift Kit are based on a unique combination of natural ingredients. For example, the label mentions coconut oil and avocado oil. Thanks to them, it is possible to deeply rebuild and regenerate eyelashes.
At-home lash lift with Nanolash – how did I perform the treatment?
The manufacturer declares that laminating eyelashes at home with its kit is easy. In addition, the effect should last up to 8 weeks on well-maintained eyelashes. I wouldn’t be myself if I didn’t check it out.
I started by removing my eyelash makeup thoroughly. Then I separated the top and bottom lashes. I proceeded to attach the silicone rods. I chose the size L for a prominent curl and, using Lash Lift Glue, I attached them as close to the lash line as possible.
I applied the products in the order they are labeled. After applying the first one, I waited 10 minutes (the producer recommends waiting 7-10 minutes), then washed off the product and repeated the same with the next ones.
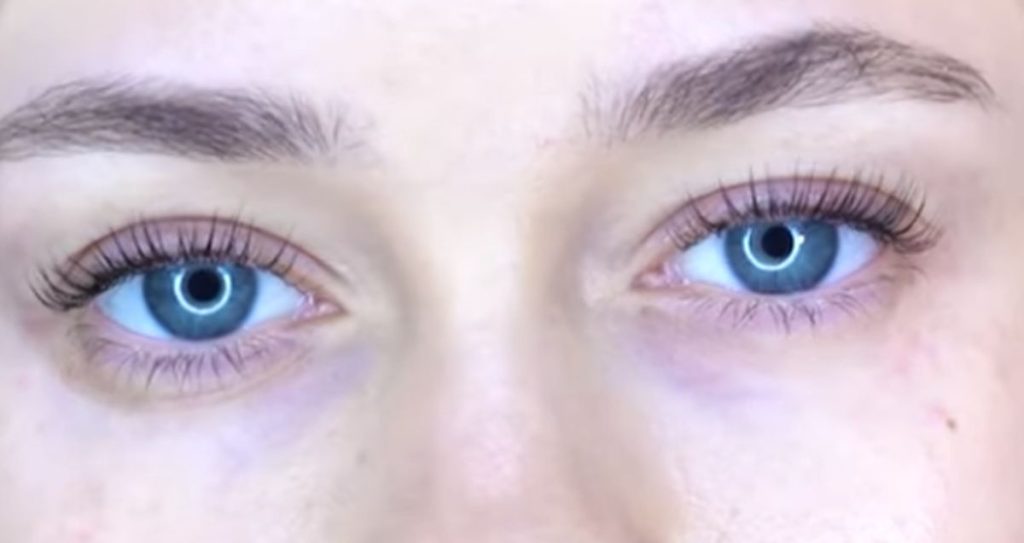
At the very end, I just peeled off the rods and was positively surprised. My eyelashes became long, thick and beautifully curled – literally after one lash lift. I also noticed that they felt soft and moisturized. The next day, when I applied the mascara, one coat proved to be completely sufficient. I was shocked! I didn’t even use an eyelash curler to give my lashes the desired shape. It seems to me that lash lift with Nanolash was the best beauty decision I made.
My conclusions and observations after testing Nanolash Lash Lift Kit
I tested and reviewed the Nanolash Lift Kit with real pleasure. I will honestly admit that I never thought that I would be able to carry out a beauty salon treatment in my own bedroom.
Laminating my eyelashes at home was a real lifesaver for the appearance and condition of my eyelashes. They have been so moisturized and so resilient before. I now do lash lamination with the Nanolash Lift Kit regularly, i.e. every 8-9 weeks or so, when the effect wears off.
One lash lift kit lasts for 10 treatments so it really isn’t too much of an expense. Considering that you no longer need to use your eyelash curler excessively and apply multiple mascara coats, it’s an efficient and economical solution.
Girls, my observations and conclusions are objective. However, if you want to experience for yourself the wonders Nanolash Lash Lift Kit can do, test it on yourself. Salon-like effects are guaranteed!